Making the most of your Agility class

Agility classes differ in terms of the experience and expertise of the instructor, focus of the class, conditions and limitations of the site where the classes are held, and other factors outside of the student’s control. To this extent, then, many of the factors influencing the experience of attending an agility class are in other hands than those of the agility student. There are, however, ways in which the student can maximize the benefits that he or she gets from the class by following some simple guidelines.

Come to class with a positive outlook. Expect to do well in class. Don’t look at the sequences or exercises to be performed as impossible tasks. Even if you have trouble with the exercise, don’t let your dog know it. When handlers sigh, complain, or otherwise express their frustration with their own or the dog’s performance, the dog will likely take it as a rebuke and become demotivated. It would be much better to pull out a toy at this point and get rid of your frustration through a game of tug.

When you make a mistake in an exercise (and if you are human you will), stop and reward the dog and then discuss with your instructor what went wrong. Too often students abandon their dogs when something goes wrong, and the dog is left drifting— wondering why mom or dad has suddenly stopped playing.

Be a good citizen and help change jump bars. One of the great challenges of teaching an agility class is making sure that students get the maximum amount of instruction without a lot of “down time.” One way to reduce this amount of down time is to pitch in and help set bars or change the course. The more people who help out, the more time left for running the exercises. Those who run large dogs should be ready to set the bars at an intermediate height while the small dog people are running and while the medium-sized dogs are getting ready to run.

Be ready to do your exercise as soon as the previous dog has finished, unless otherwise instructed by the instructor. If after every dog’s run the next student takes 30 seconds getting ready to go, that’s a lot of lost time.

Another way to save time during class is to confine your dog in a crate, x-pen, or to a post with a leash while you are walking a sequence or otherwise participating in instruction that doesn’t actually require your dog to be active. Frequently, handlers are over-confident in their dogs’ ability to remain in a sit-stay, and they leave their dogs while learning a new sequence. What often happens is that the dog breaks his stay, the handler has to reposition the dog, and valuable time is lost * not to mention the fact that the dog has now learned that maybe the sit-stay is only a suggestion, not a command.

Pay attention to those who run the sequence before you. Not only does watching the other runs reinforce what the sequence or exercise may be, it also gives you some insight into what problems may develop and how you can avoid them. Listen to what the instructor says to correct other students. If you spend the time between your runs as a social hour, you will miss valuable ideas. Save serious socializing for before or after class (arrive early/stay late!) Arrive early, potty your dog, warm your dog up a little should be here somewhere.

Ask questions and consider bringing a paper and pen to class so you can write down things you learned, things you want to work on, and interesting sequences. Ideally you want to keep a training journal that tracks the progress of your dog. Especially note progress or problems in specific areas: start line stays, tight turns, knocked bars — so that in looking back at your progress over weeks of classes, you can identify what works and what doesn’t.

Provided you aren’t disturbing other members of the class and are able to follow along with what is going on in the session, class time can also be good for working on attention issues with your dog. The distractions may provide you with an opportunity to proof your dog’s ability to remained focused on you.

Whatever other goals you may have for your training, make sure that your dog sees agility training as a positive experience. If you work hard to achieve this goal, your other training goals are thereby more easily attained.

The Push Back/Serpentine Combination

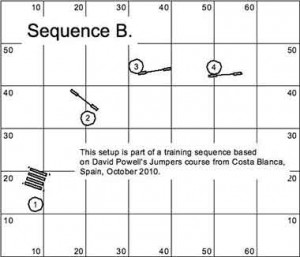
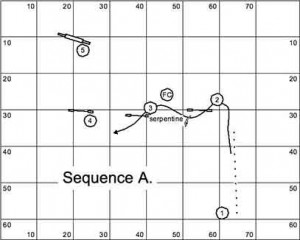
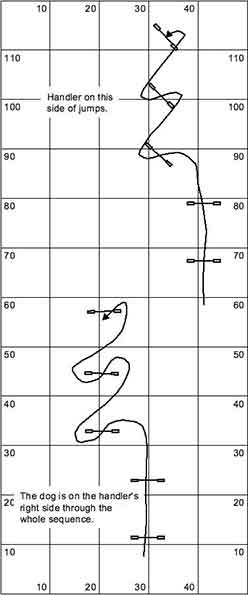
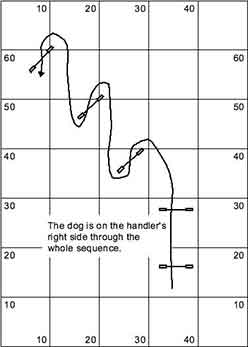
In preparing for the AKC World Team tryouts this past May, like many other competitors, I’ve been running sequences and courses based on courses designed by David Powell and Rolf Graber, the two judges who will be officiating at the Agility World Championship in Liévin, France in October. Since it’s difficult to set up and run all the courses that these two judges have created, I like to look over  their course maps, identify the handling challenges, and categorize these challenges in groupings that seem to make sense in terms of the particular handling skills that are needed in order to pull off these challenges successfully.  Once I’ve identified a few types of typical challenges, I’ll design some training exercises that give me a chance to work on these skills without having to set up very much equipment.   One challenge I’ve noticed cropping up a few times is illustrated by the two following diagrams that are both inspired by jumpers courses that David Powell designed:

Sequence A

Sequence A

Sequence B

Sequence B

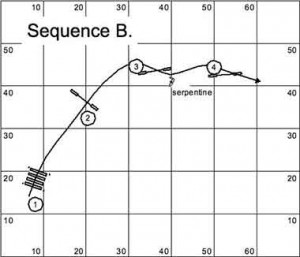
(Since both sequences come from the middle of larger courses, I don’t intend that the handler should use lead outs in performing them.)  One option for handling Sequence A might be for the handler to push the dog to the back side of jump #2 and then perform a serpentine maneuver to pull the dog over jump #2.  Likewise in Sequence B, the handler could push the dog to back side of jump # 3 and then perform a serpentine to pull the dog over jump #3.  In both cases, the serpentine allows the handler to show the dog the proper side of the next jump easily.  The next two diagrams illustrate how I actually ran the two sequences:

 In Sequence A, I pushed the dog to the back side of #2, serpentine to pull the dog over #2, then I kept the dog on my right hand and ran through the gap between #2 and #3, and then put in a front cross which enabled me to perform the next turn through #5 easily.

In Sequence A, I pushed the dog to the back side of #2, serpentine to pull the dog over #2, then I kept the dog on my right hand and ran through the gap between #2 and #3, and then put in a front cross which enabled me to perform the next turn through #5 easily.

In Sequence B, I pushed to the back side of #3, serpentined #3, and then pushed to the back side of #4 (perhaps a serpentine might be required to pull the dog over #4, depending on where the course went after #4).

In Sequence B, I pushed to the back side of #3, serpentined #3, and then pushed to the back side of #4 (perhaps a serpentine might be required to pull the dog over #4, depending on where the course went after #4).

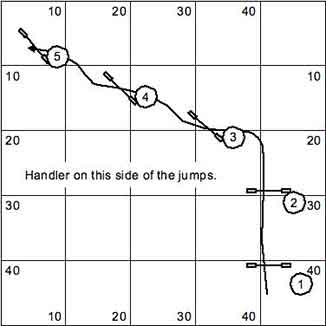
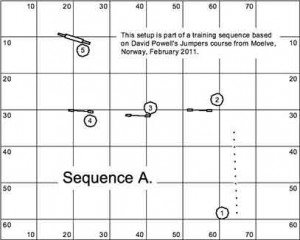
The challenge of pushing to the back side of a jump and then immediately doing a serpentine on that jump is that it might seem as if the handler needs to be in two places at the same time:  the ideal spot for the push back is one wing of the jump while the ideal spot for the serpentine is the other wing.  The way to make this combination of maneuvers more possible is to practice variations of it that make it easier for the dog to find the back side and the handler to get to the serpentine position.  The following diagram illustrates a set up that is intended to do this:

   In this set up, the line that the dog takes from #1 to #2 makes it very easy for the dog to find the back side of #3.   The positioning of #3,  #4 and #5 makes it easy for the handler to get to the serpentine position and prepare for the next push back.   (Make sure not to displace jumps #4 and #5 too much.  If they are displaced too much, then the sequence from #3 to #5 becomes a straight line,  and the handler won’t need to serpentine at all.) Good moments to reward the dog are when the dog commits to the serpentine at #3  and when the dog commits to the proper side of #4. I would toss a toy just to the right of #4 once it is clear that the dog is committed to that side of the jump.

Once the dog gets more comfortable with doing the back side of the jump without excessive help from the handler,  the handler can start making the sequence more challenging. The following diagrams illustrate a variety of ways the handler can make the exercise   incrementally more challenging:

And for the advanced dog-handler team:

After practicing these exercises, the dog may start looking for the back side of jumps even when the handler doesn’t intend this performance.  Alternate push back/ serpentine training with threadle training to maintain balance in the dog’s handling repertoire.