The Push Back/Serpentine Combination
In preparing for the AKC World Team tryouts this past May, like many other competitors, I’ve been running sequences and courses based on courses designed by David Powell and Rolf Graber, the two judges who will be officiating at the Agility World Championship in Liévin, France in October. Since it’s difficult to set up and run all the courses that these two judges have created, I like to look over their course maps, identify the handling challenges, and categorize these challenges in groupings that seem to make sense in terms of the particular handling skills that are needed in order to pull off these challenges successfully. Once I’ve identified a few types of typical challenges, I’ll design some training exercises that give me a chance to work on these skills without having to set up very much equipment. One challenge I’ve noticed cropping up a few times is illustrated by the two following diagrams that are both inspired by jumpers courses that David Powell designed:
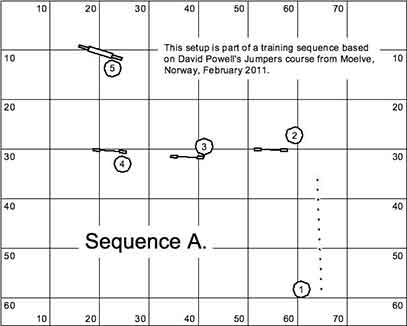
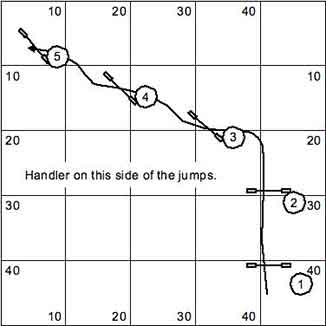
Sequence A
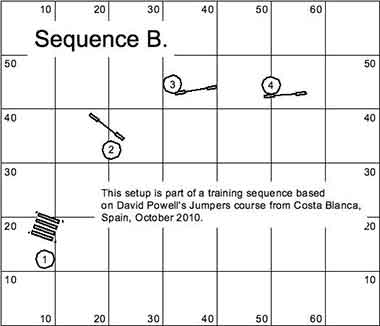
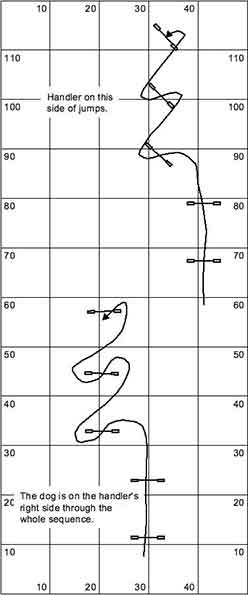
Sequence B
(Since both sequences come from the middle of larger courses, I don’t intend that the handler should use lead outs in performing them.) One option for handling Sequence A might be for the handler to push the dog to the back side of jump #2 and then perform a serpentine maneuver to pull the dog over jump #2. Likewise in Sequence B, the handler could push the dog to back side of jump # 3 and then perform a serpentine to pull the dog over jump #3. In both cases, the serpentine allows the handler to show the dog the proper side of the next jump easily. The next two diagrams illustrate how I actually ran the two sequences:
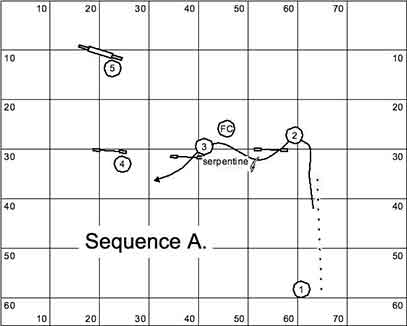
In Sequence A, I pushed the dog to the back side of #2, serpentine to pull the dog over #2, then I kept the dog on my right hand and ran through the gap between #2 and #3, and then put in a front cross which enabled me to perform the next turn through #5 easily.
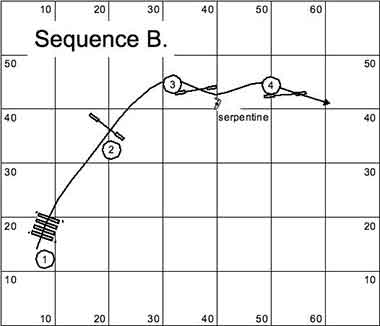
In Sequence B, I pushed to the back side of #3, serpentined #3, and then pushed to the back side of #4 (perhaps a serpentine might be required to pull the dog over #4, depending on where the course went after #4).
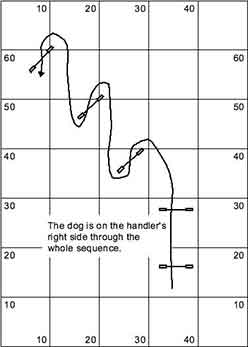
The challenge of pushing to the back side of a jump and then immediately doing a serpentine on that jump is that it might seem as if the handler needs to be in two places at the same time: the ideal spot for the push back is one wing of the jump while the ideal spot for the serpentine is the other wing. The way to make this combination of maneuvers more possible is to practice variations of it that make it easier for the dog to find the back side and the handler to get to the serpentine position. The following diagram illustrates a set up that is intended to do this:
In this set up, the line that the dog takes from #1 to #2 makes it very easy for the dog to find the back side of #3. The positioning of #3, #4 and #5 makes it easy for the handler to get to the serpentine position and prepare for the next push back. (Make sure not to displace jumps #4 and #5 too much. If they are displaced too much, then the sequence from #3 to #5 becomes a straight line, and the handler won’t need to serpentine at all.) Good moments to reward the dog are when the dog commits to the serpentine at #3 and when the dog commits to the proper side of #4. I would toss a toy just to the right of #4 once it is clear that the dog is committed to that side of the jump.
Once the dog gets more comfortable with doing the back side of the jump without excessive help from the handler, the handler can start making the sequence more challenging. The following diagrams illustrate a variety of ways the handler can make the exercise incrementally more challenging:
And for the advanced dog-handler team:
After practicing these exercises, the dog may start looking for the back side of jumps even when the handler doesn’t intend this performance. Alternate push back/ serpentine training with threadle training to maintain balance in the dog’s handling repertoire.